
True, this nested lab will not impress you with a high performance, but it works.
Mainly this example will help you to understand the necessary steps to install your own homelab without investing a lot of money in hardware. And you do not need a physical shared storage, as we use an openfiler to provide an NFS Share using the local hard discs.
Of course you can use any other available hardware. I used the old HP DL380 G5 just as an example. The only thing you should take care is, that the hardware is supported for vSphere 5.x (take a look at the HCLs for this).
What hardware do you need:
– One HP DL380 G5 Server with as much RAM as you can find (minimum is 16 GB, better have more) and enough discs to provide two arrays with about 400 GB each.
– An USB Stick to install vSphere ESXi 5.x
– a client to connect to the ESXi installation via vCenter Client
Here you can see what we plan to do:
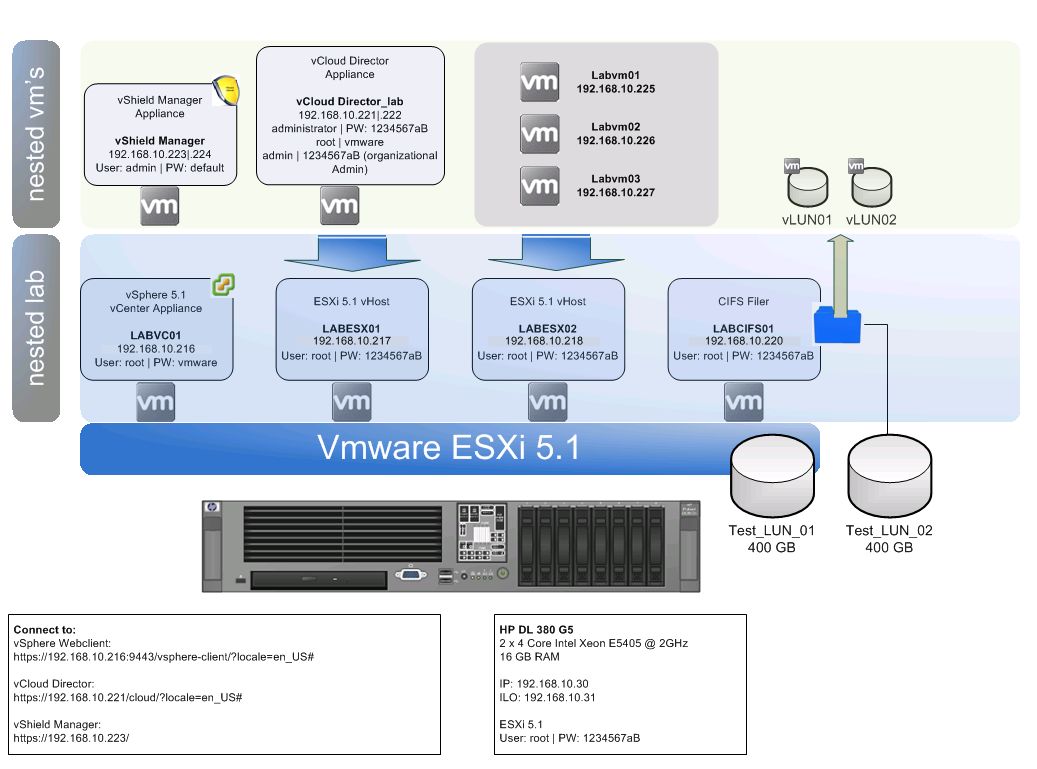
First we will install ESXi 5.1 on our HP DL380 G5 Hardware.
Then we install four virtual machines for our Lab: two nested ESXi Hosts, a vSphere 5.1 vCenter Appliance and an Openfiler to provide NFS shares as a shared storage for the nested ESXi hosts.
Last but not least we will install some virtual machines on top of the nested ESXi hosts.
I will not provide you a real step by step manual where you can see a screenshot of every window coming up during installation.
You should already have some experience in installing and configuring vSphere 4.x or 5.x.
The How-to is splitted into the following steps:
Intro
Step 1 – configure BIOS Settings and build two arrays
Step 2 – install ESXi 5.1 on your HP DL380 Server
Step 3 – install and configure vSphere 5.1 vCenter Appliance
Step 4 – install the openfiler 2.99
Step 5 – configure the openfiler to provide NFS Shares
Step 6 – Install the nested ESXi Hosts for our LAB environment
Hi Andreas,
vielen Dank für dieses gute Tutorial!
Wie hast du es aber geschafft 64bit Maschinen neasted auf dem DL380 G5 zu installieren?
Ich habe zwar zwei Xenon 5160 aber die unterscheiden sich laut Intel nicht wirklich zu deinen:
http://ark.intel.com/de/compare/33079,27219
Auch habe ich folgende Einträge im BIOS nicht:
– Intel(R) Hyperthreading Options -> enabled
– Intel(R) Turbo Boost Technology -> enabled
– Intel(R) VT-d -> enabled
Welche BIOS Version hast du installiert? Meine ist aktuell auf: 2011.05.02 (A) (20 Jul 2011).
Danke und Grüße,
Sebastian
Very Very good tutorial , everything was so good and clear , but l did not understand one thing , what is nested ?
Geschrieben,
“nested”: one embedded inside of the other. Esxi is normally installed on a physical PC or server. For “nested” case, an Esxi is installed in a Virtual machine not physical one.
I have a quick question.
I was able to get the following equipment from my work place to use for my lab.
Now the question is that how much can I really practise while running things on a monster lab server with the following specs as shown below.
Or should I invest in building a physical 4 host server lab rather than going for the nested route.
The keys things I’m testing and preparing for are for vcix dc and nv tracks.
Cheers!
1x SuperServer 7048R-C1RT4+ – 4U/Tower – 16x SATA/SAS – LSI 3108 12G SAS – Quad 10-Gigabit Ethernet – 1000W Redundant
2 x Six-Core Intel® Xeon® Processor E5-2603 v3 1.60GHz 15MB Cache (85W)
8 x 32GB PC4-17000 2133MHz DDR4 ECC Registered Load-Reduced DIMM
2 x 64GB SATA 6.0Gb/s Disk on Module (MLC) (Vertical)
2 x 240GB Intel® SSD DC S3500 Series 2.5″ SATA 6.0Gb/s Solid State Drive
Integrated Video (Included with Motherboard)
Integrated LSI 3108 SAS 3.0 12Gb/s 8-port RAID Controller with 2GB Cache
Intel® Ethernet Server Adapter I350-T4V2 Quad Port (4x RJ-45)
Included Supermicro Mobile Rack M28SACB-OEM