Install and configure ESXi 5.1 on your HP DL380 Server
In this step you have to install and configure vSphere ESXi 5.x on your physical hardware:
• download the HP ESXi 5.1 Image
link to the HP branded Image
link to the VMware download site
• install ESXi 5.1 on your HP Hardware
• configure the necessary network settings, password, etc. to access the host via vCenter Client from your workstation
Edit the config file /etc/vmware/config
To boot a 64bit operating system on a nested ESXi host, it is necessary to edit a config file.
To do so, enable SSH on your ESXi host and connect to it using e.g. putty.
Now use an editor like “vi” to edit the file /etc/vmware/config:
add the following line if using vSphere ESXi 5.0:
vhv.allow = “TRUE”
add the following line if using vSphere ESXi 5.1:
vhv.enable = “TRUE”
Done? Now it is time to connect to your ESXi Host via vCenter Client for the first time!
If you select the configuration tab you will see the warning “The ESXi host does not have persistant storage.”.
Select “Add Storage” and add two datastores using the configured arrays with 400 GB each. We named them “Test_LUN_01” and “Test_LUN_02”:

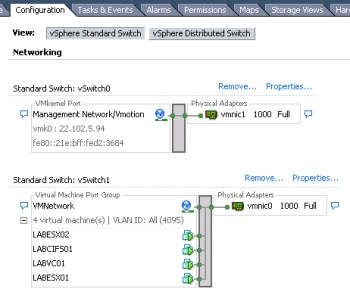
Of course you have to configure your network settings, too. In this example we only configured a necessary minimum. But I am sure you will have your own ideas how to setup your network design:

Go to Step 3 – install and configure vSphere 5.1 vCenter Appliance >>>
Intro
Step 1 – configure BIOS Settings and build two arrays
Step 2 – install ESXi 5.1 on your HP DL380 Server
Step 3 – install and configure vSphere 5.1 vCenter Appliance
Step 4 – install the openfiler 2.99
Step 5 – configure the openfiler to provide NFS Shares
Step 6 – Install the nested ESXi Hosts for our LAB environment

One thing to note is that your system CPU should support EPT if it’s Intel or AMD RVI for MMU virtualization in order for this to work!
Peter
viadmin.com