Install the openfiler to provide NFS Shares for our nested ESXi Hosts
If you have already worked with an openfiler, this step will be very easy for you.
If it is the first time, I am sure that the instruction below will help you, as it is a little bit tricky if you have never done it before.
The goal of this step is, to provide two NFS shares for our nested ESXi hosts:
• download the binaries from www.openfiler.com
• connect with vCenter client to your physical ESXi 5.1 Host
• create a new virtual machine with the following settings:
– select “custom”
– name it “LABCIFS01”
– use “Test_LUN_01” as storage
– use HW Version 8
– select Red hat Enterprise Linux 6 (64-bit) as Guest Operating System
– provide 1 vCPU and 4 GB RAM to the VM
– connect it to the VMNetwork (one vNIC)
– use VMware Paravirtual SCSI controller
– create a new virtual disc with a size of 10 GB
• after the VM is created, select “edit settings” and add two more hard discs with a size of 150 GB each (but do not forget to specify an individual datastore using Test_LUN_02!)
• now connect the downloaded ISO to the CDRom and start the VM
• open the console to the VM
• press “Enter” to install the openfiler and just follow the wizzard.
There are only two steps where you should take care:
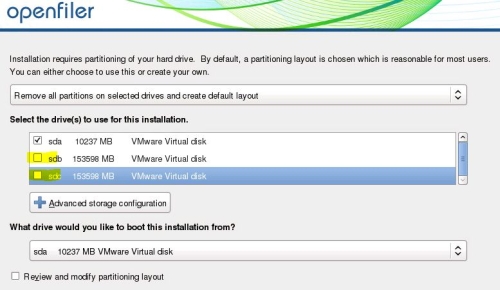
When you are asked to select the drive for the installation, do not forget to deselect “sdb” and “sdc”:

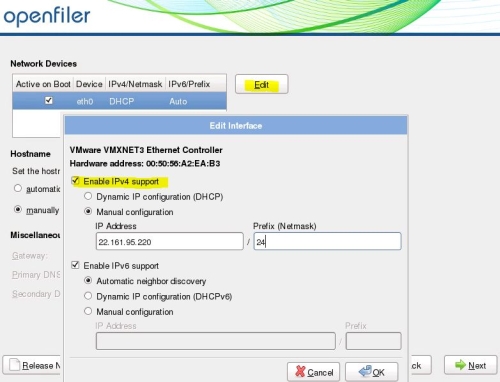
And here – do not forget to set the network settings:

When you have finished the installation you can use a browser session to configure the openfiler:
https://
Now use the user: “openfiler” with password: “password” to login to the openfiler configuration site!
Go to Step 5 – configure the openfiler to provide NFS Shares >>>
Intro
Step 1 – configure BIOS Settings and build two arrays
Step 2 – install ESXi 5.1 on your HP DL380 Server
Step 3 – install and configure vSphere 5.1 vCenter Appliance
Step 4 – install the openfiler 2.99
Step 5 – configure the openfiler to provide NFS Shares
Step 6 – Install the nested ESXi Hosts for our LAB environment
